↠ SEEK THIS VIDEO EPISODE ↞
↠ SEEK THIS FULL STORY ↞
After Andy and I welcomed Paul (our professional welder and founder and owner of RVA Mobile Welding Services) to the farm for our most serious welding work yet …
we were left with a 1965 Clark Cortez that resembled more of a patchwork quilt than an RV.

Looking at our newly welded roof, I finally understood what Andy meant when he tells me often, “It doesn’t have to be perfect — It simply has to be the best we can do.” For instance, we could have asked Paul to weld on an entirely new roof … but that would have been a mammoth job (which also would equate to a very large amount of money owed).
Plus, if I’m honest, I sort of like the way the patchwork looks — It shows our Cortez’s age, the wear; and it shows her new life, the love.
What was concerning wasn’t our patchwork design but the rust that had already started to form on the roof. To explain, let’s go back to our last job: The moment Paul finished welding, a storm (of course) moved in so Andy and I frantically worked to drive the Cortez under a covered space. Even so, raindrops made their way onto our RV’s recently stripped all-steel roof. If you aren’t metal fans, just know steel does rust. In fact, I’m convinced one mere thought of rust simply around steel causes the metal to corrode. This is why, if you ask me, one ill-fated Cortez design is its all-steel body.
Back to what we were seeing: It was evident the storm’s gift of humidity and raindrops were not well received and, on top of this, we were nearing the end of September so autumn was fading as quickly as those colorful leaves.
“Winter is coming,” I had been saying to Andy because we couldn’t risk hurricane season (which continues through the very end of November in Virginia) and certainly not a snow or ice storm once winter hit.
“I know,” Andy remarked back in a doomed voice, and I was well aware he could also see the rust eating away at our hard work. “We need to treat the roof before winter.”
This seemingly easy task is where this post picks up: Andy and I focused on protecting and finishing off the roof.
To start, we needed to get the surface rust off the bare metal. As we began this job, we got a pleasant surprise — My sister and her husband rolled onto the farm and, even better, they offered help on our Cortez overhaul.


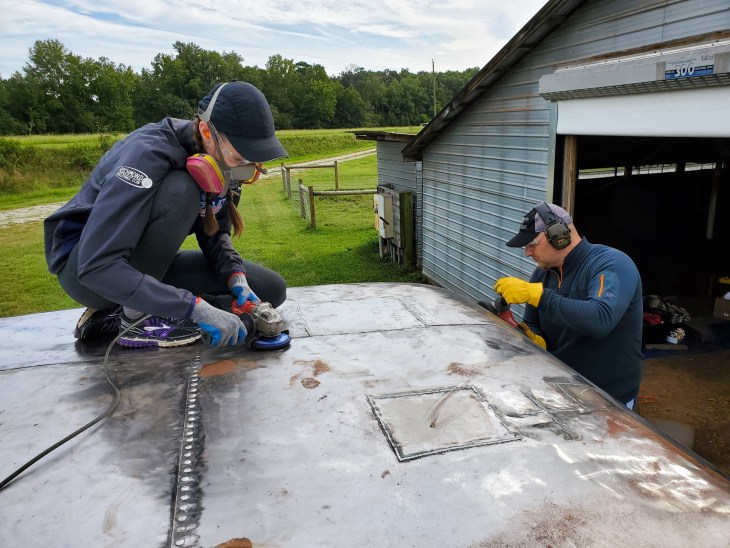
“Can I break anything?” my sister asked after angle grinder training by none other than me. ( I know — I can almost hear the applause for how far I’ve come.)
“No,” I said.
“Can I break this?” and my sister pointed to the roof of our strong steel beast.
“No,” I said again.
There was a moment’s hesitation before her final question: “So there’s nothing I can potentially harm or break?”
“No,” I said once more, and I remembered how that felt — The overwhelming nervousness than some action you would accidentally do would cause a major and irreversible problem or damage.
I wanted to remind her of what we were working on and how some days I fully believed even a bomb couldn’t harm the Cortez more than its own age.
However, before I could do that, relief seemed to absorb into my sister’s body and without another hesitation, her angle grinder’s stripping wheel went to work.

While my sister and brother-in-law removed rust by my angle-grinding side (well, except for the times I jumped down to document the progress), Andy took to grinding the welds in our grill. (For those that have been fortunate enough to not be in need of welding, grinding welds means the welds do not remain as clumps of metal but instead are flat and neat.)

Hours passed in dedicated silence (minus four angle grinder roars) until our roof was finally and once again rust free, which also meant it was time for my sister and her husband to go. (A massive thank you once more to them — Saying the work went by faster with help is obvious, but what may not have been said enough was the huge pick-me-up they gave Andy and me. To them, thank you for your support, positivity, and willingness to step in!)
With Andy and I once again solo, we returned to our roof where we brushing on rust neutralizer to ensure there would be no future rust problems.

This stage went smoothly … minus me pouring about one-fourth of the neutralizer onto the roof, though (as Andy pointed out) the goal was to soak the metal (which is why we drenched shop towels and laid them across our roof) so me dumping the liquid everywhere simply spread it faster. Call it ingenuity.
With the directions telling us to let the neutralizer sit, we paused to watch the sun set.
The lavender-pink sky reflected in our metal, and it was one of those moments we were able to appreciate where we were with the Cortez while also to picture where we wanted to go in the Cortez beyond our farm stay — all the sunsets, future sunrises, and moments between each.
Returning the next morning, Andy and I pulled our shop towels off before rinsing — yes rinsing, according to the directions — the neutralizer off with water.

Here, we were able to see places areas that had previously rusted because they turned black, which the directions state, means the rust had been converted — wonderful news.


Even better, our RV’s roof was so shiny it looked like an Airstream.


After this, we scratched the surface with an abrasive pad then ground the roof welds. Finally, it was time for panel wipe to properly clean the roof for our body filler …
I’ll have you know there is a fine art to body filler, and I can say this after going through body filler training with Andy. Important lessons I learned are the following:
- Always put your lid back on the body filler while working. (I believe this is to prevent the body filler from drying out, but I also like to believe it is to prevent clutzes from getting debris inside the body filler can. Not that I am speaking from personal experience or have had this happen when I maybe dropped the body filler-covered lid on an uncleaned surface and maybe had debris sticking to it … )
- Body filler and hardener are two separate products. (I somehow thought if people purchase body filler, it is ready to go. Apparently instead, people have to mix a hardener with the body filler because if these were pre-mixed before purchase, there would be one hardened lump of, well, solid and unusable body filler waiting.
- Body filler sets quickly once the hardener is mixed — and it sets even faster on hot days (such as the one we were working in).
- Because body filler sets quickly, it is wise to mix too much versus too little. However, don’t panic and think the world is over if you think you mixed too little in the middle of covering your body filler on the surface (again, not that I would ever do this). Simply continue to push the filler into the cracks and crevices that need covering and keep spreading.
Intending to apply body filler over our welded areas, we started by wire brushing then panel wiping those locations once more …


After, it was body filler time, which would give our RV’s roof a chance to appear smooth and beautiful. Andy stressed not using a great deal of body filler because our Cortez is covered — and I do mean covered — in it. In fact, it seems the entire body of the Cortez has about two inches of body filler over it, which is not how body filler should be applied. This is why we aimed for as few of locations as possible.


Once our body filler had dried, it was time to sand it with a sander. Essentially I learned you are doing this job correctly if you feel you are removing all of your hard work with a sander because what should be left is the thinnest covering smooshed inside the cracks and crevices.


Body filler complete, we cleaned with panel wipe once more and then our sealant came out. Our plan was to seal the pinholes on all welds and seams, along with in the gutters. This would make our RV water-tight (well, beyond replacing the window and door seals).

Finally, it was time to hoist up the paint. I want to pause to explain a thought passing through my mind: This is a ton of steps to simply paint a roof, and know what? I thought this too in the moment — and was even surprised, which I absolutely should not have been because you’d think by now when Andy tells me the next Cortez job — such as “painting the roof” — I would have enough sense to realize it is never actually that one job.
Instead it is comprised of numerous little jobs that equal the one overview-job so “painting the roof” instead becomes stripping the roof, grinding welds, brushing on rust neutralizer, rinsing the roof, scratching the surface, wiping with panel wipe, re-scratching the surface, re-wiping with panel wipe, applying body filler, sanding down the body filler, re-wiping with panel wipe, applying a sealant, and — finally — painting the roof.
Bless it, you’d think I’d learn by now that (in this case) one job equals thirteen.
However, we finally made it to painting the roof!


Andy did a large amount of research on the best roof paint only to determine it is not actually paint — It is a roof coating that is 100% silicone. According to the product, it can be applied to RVs, trailers, mobile homes, and more and provides a signifiant difference in deflecting heat. We can attest to this too because after we painted to now (a little less than three years later), we often touch an interior wall panel (that has standard paint outside) and compare it to the feeling of an interior ceiling panel (that has the reflective silicone outside) — and the difference is startling.
The ceiling panel truthfully feels cool to the touch while the wall panel is often so hot we cannot leave our hands there long.
We have a link to this roof coating on our restoration’s bodywork page so I’ll move on to how our paint job turned out …
As we were painting, the September sun was setting fast so Andy and I accelerated our pace. Not only were we losing our only source of light, but we were more than concerned that an incomplete job meant rust could re-spread on our bare metal again. We needed to protect our roof now — and we needed to protect it quickly. This thought made us rush and do a rather sloppy job so that when we returned the next day to view our work in the daylight — let’s say I was less than impressed. Insects had fluttered across the silicone, other bugs had gotten stuck in the silicone, there were more runs than I could count, and our work was patchy. It was the least impressive job I’ve seen us do on the Cortez thus far, and to be honest it was incredibly deflating and irritating. Thirteen jobs we went through with painful precision as best as we could muster … only to find this.
Not only that, but when we examined our work more closely, we accidentally scratched through the silicone and that’s when I came to find the silicone easily peeled off the roof. Now I became more than unimpressed — I believe I was quite furious.

Long story short, I learned many lessons, such as not to rush a job and also to allow maximum time to complete jobs. I further learned to set ourselves up for success, such as by asking my aunt and uncle if we could use the garage for the night to let the paint dry. Lastly, I contacted the company to learn what we did wrong. The representative told me we should have used large at-least nine-inch rollers with at-least half-inch necks due to the silicone being thicker (we had used super tiny rollers). It was also suggested to paint in light layers (we had painted heavy).
The saddest part of the news though is that additional coats of paint would not solve our problem so, being that I am obsessive, I have convinced Andy that we need to re-do the job at a later date. If we do this, I want to add body filler over the roof seams and areas where heat-induced welding tension caused the metal panels to bend. Essentially, I aim to have our final product be a smoother roof.
In truth, it’s taken about two years for me to move past our errors, which I suppose is another lesson learned too — I realize now that mistakes do happen and that while I hold Andy and I to high quality work, at the end of the day, we are not an expert restoration crew nor want to be. We are quite proud of the fact that we are people without professional training, and yet we are still able to pull off hard jobs.
Therefore, maybe the biggest lesson I learned is that I should give us a large amount of grace and applaud the fact that we did this, that we are doing this, and that we will continue to restore our antique RV.
Your post encourages me to do some DIY on my RV roof also. Well, I am currently planning to coat my roof with ‘’RV Roof Magic’’ that is an ASTM certified and solvent based product. It can be applied without any professional roofer’s aid using a nap roller and takes only 4 to 5 hours to completely dry at temperatures above 50 degrees giving long term peace of mind due to its incomparable features. It is a waterproof, airtight, and highly insulated coating having high tensile strength and remarkable weather resistant properties (can withstand ponding water 365 days a year) that will make my RV roof extremely resistant in harsh weather conditions. Wish me good luck for my job.
https://www.rvroofmagic.com/
Hi Jonson,
Thank you for writing and for your kind comment — We’d love to know more about your RV!
We also appreciate you sharing this with us — We would like to go back and finish off our roof after seeing where we went wrong so we will definitely investigate this product. I’ll be sure to share both your comment and link with Andy — He and I appreciate it!
L (and Andy)