↠ SEEK THIS VIDEO EPISODE ↞
↠ SEEK THIS FULL STORY ↞
It was a rainy day before Christmas in 2019 when Andy confessed to me that he wanted to fabricate our 1965 Clark Cortez motorhome’s air intake.
For starters, I did not know what an ‘air intake’ was and so I certainly did not understand how to create a seemingly integral vehicle part on our own. Then he said this — which single-handedly removed any dose of optimism I may have felt: “It will be easy and quick.”
Friends, if there is one lesson you should take away it is the lesson I have learned most: When it comes to any job being “easy,” that word guarantees the opposite and when it comes to any job being “quick,” go ahead and mentally prepare by tripling the estimated time because this is the way with vehicle restorations, which means this is our way, too.
Yet, Andy is in charge of our steel beast and its mechanical needs so all planning endeavors fall solely to him.
“Easy and quick?” I asked.
“Easy and quick,” he promised and so we set off to the farm, consumed in a lesson on air filters and heat shields and air intakes and fabrications and upgrades.
Here’s what I learned: Air filters ensure the air going into engines is debris-free, and intake systems guide that clean air into engines.
Thirty minutes later, my mechanical lesson was complete, along with our journey to the farm, so we hopped into our Cortez to head to the garage . . . only to discover a very substantial amount of water inside our motorhome. Water had pooled on and over our dashboard, leaked down all doors, and soaked into our ceiling’s insulation so that the panels bowed out and leaked out.
“I think we have leaks,” Andy told me and I distinctly remember telling him, “I feel as if the roof will fall in” — which it totally did on a later day when we took our beast on a test drive. Right as we moved into a turn, the ceiling panels gave way, allowing disgusting rusty rainwater to splash on top of my head . . . but that’s a story for another time.
“Let’s add it to the list,” we agreed before rejoicing in small victories — Our windshield wipers that we previously installed worked!
Hoping for another wise restoration upgrade, we set to work removing the intake system that came with the Cortez. This was composed of a very worn and therefore very sad red flexible hose . . . that led down to an old-fashioned crumbling paper-style air filter . . . which was next to the exhaust manifold, meaning there was not a heat shield to separate the two (so the area was hot — as in the hottest part of our motorhome — and that meant there was no cool air getting into our engine).


Because our engine was swapped, the air intake was not factory so those original engine covers — well, they apparently required two large holes cut out to allow the intake to run not inside the engine cover but on top of it. (Yep, we’ve added “new engine cover” on our list of repairs, too.)
To fix our intake problem though, we started by removing our carburetor elbow . . .

which we are keeping because we are using the same carburetor (or, um, at least until Andy can convince me to go electronic fuel injection, which would would eliminate the carb and choke — again, another story for another time . . . possibly). Because I have essentially have no idea what I am doing, my role is often boiled down to as “cleaner” so I began cleaning the elbow.
Soon it looked good-to-go and so I reinstalled it, along with our new fancy reducer hose that Andy fabricated using clamps and a silicone hose . . .

This new one should hold up far better than the earlier dilapidated red one . . . so let’s gleefully throw that sucker out!

Next up, Andy took one three-inch aluminum pipe and measured it so that one end would fit into the carb elbow and the other, into a ninety-degree elbow (also made by clamps and a silicone hose) that would lead back down into the engine bay.

Measurements marked, he cut the pipe using a table saw . . .


then filed the metal edges smooth . . .
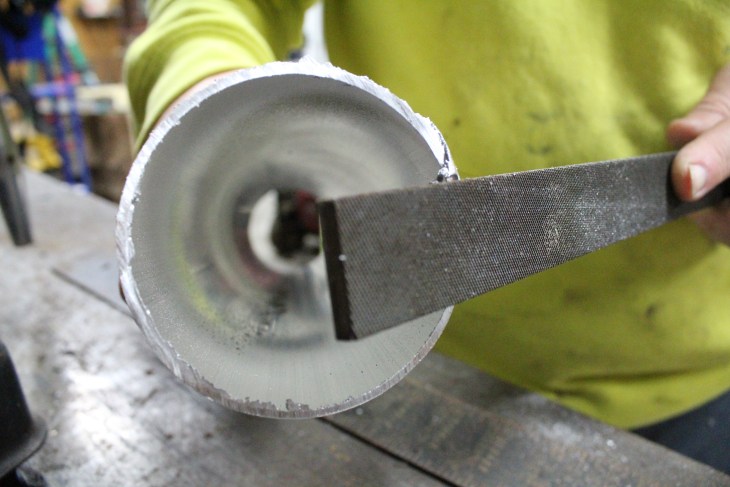
and lastly, wrapped this pipe in a heat protective wrap to prevent “heat soak” or air warming as it moves through pipes.

With the wrap on, we pushed one end into the carb elbow and the other into the ninety-degree elbow; and I confess the entire time we worked, I was giving Andy a “right ear ache” about how he got to use the super-cool table saw and I had the damned cleaning cloth so don’t you worry — That issue was rectified with our second aluminum pipe. This one would go from the ninety-degree elbow down into the engine bay’s air filter. Therefore, measured and marked, now it was time to tell my man to step aside and hold the cleaning rag!


Little metal bits were flying and I was cutting, and basically what all this means is I am a badass — evident by this picture:

In equally cool news, did you know the little bits of metal that chip off during machining has an actual name? It is called ‘swarf.’ Knowledge is power, my friends, so take that information and do as you will with it.
After our second aluminum pipe was cut, we returned to our steel beast to finish off our upgraded air intake. For that, another heat protective wrap went around the pipe and then the ends were pushed into the ninety-degree elbow and our new and also upgraded air filter . . .


With this installed, we moved forward to our final fabrication: creating our air filter’s heat shield. For this, we riveted two aluminum panels together in the tiny bit of space between that air filter and exhaust manifold . . .

Job done, we started our Cortez . . . and the result? One engine that was massively quieter than before! I’m not gonna lie: My exhale was probably heard all the way in England because a secret fear I had is that our engine’s roar would never be quieted so knowing that this intake helped, I was hopeful moving forward that we would have an even quieter engine once a new insulated engine cover was fitted.
Yet, as Andy and I stared in awed happiness at our engine, our spirits were quickly — and literally — damped when we became more aware of the rainwater dripping in and onto our heads so there’s a huge clue about what job we bumped up next . . .
More to come on that soon!
↠ SEEK OUR PARTS ↞
Interested in the parts we used for this job? Seek our Mechanical Restoration page and click on ‘Engine’ in the Mechanical Contents. If you need additional information too, leave a comment and we will do our best to help!
Wait. Y’all did this back in 2019? I really like the description of the old intake as “composted”. I’ve tried to compost kitchen refuse but never auto parts. Kidding: autocorrect strikes again?
Hi David,
Yep — Back in 2019! Unfortunately filming and editing video for our YouTube channel has seemed to take over when I normally had time to write, which I’m saddened about because writing is my passion.
Do you mean “composed”? I did type that to describe what made up the old air intake but I don’t see “composted”… Either way, you know I appreciate the read and the look-over — While I love writing, I’m far from perfect at it hehe
Thanks for stopping in!
L (and Andy)
Every day is a school day Laura. What would you do without access to the workshop.?? XXXX
Definitely, and I do love learning! I agree — The workspace, the garage, the farm, all of it we are so incredibly grateful to my aunt and uncle!
Miss you much, midad!
L (and Andy)